version 1.0
Raspi Drive makes your Raspberry Pi into a wireless NAS server
Contents
Screenshots


Requirements
A Raspberry Pi that has wifi support and a USB port.
A micro sd card.
And either a USB stick or a USB hard drive.
Setup USB Drive or USB Stick
- Plug the hard drive or USB stick into your computer
- Open Disk Utility if you are using a mac computer or Windows Explorer if your are using a Windows Computer
- For Windows users right click on the drive and click format
- For Mac users select the drive then click erase
- When you get to the format/erase page format the drive to be ExFat then click Erase/Start
- Let it load until it says complete then make sure its formated in ExFat
- Eject the drive from your computer
Setup Raspberry Pi
- Flash Rasbian Lite on to the micro sd card. Download Latest Version Here.
- Unzip the downloaded file.
- Flash 2019-09-26-raspbian-buster-lite.img using Etcher.
- remount the micro sd card (unplug it and replug it back into your computer)
- Open Terminal in mac or command prompt in windows
- Run the following command to enable SSH
touch /Volumes/boot/ssh - Next, we need to set up wifi. Download this file named wpa_supplicant.conf.
- Now open up the file that you just downloaded and change the SSID to your network name and the psk to your networks password.
- Copy the file you just edited and paste it to the boot partition of your micro sd card
- Unplug the micro sd card from your computer and insert it in your pi.
- SSH to your pi. (I use termius on my mac to use SSH with my pi)
- Plug the drive you formated in to your pi
Skip the steps above if you already set up your raspberry pi with ssh and wifi.
Running the Installer Script
Install Raspi Drive by entering this into your ssh command line
wget -q https://git.io/JewLJ -O /tmp/raspi-drive && bash /tmp/raspi-drive
After the installation is complete please reboot your pi with sudo reboot
Note: This is the fastest way to get Raspi Drive on your Raspberry Pi.
Manual Installation
If you would like to manually install this then you can follow these instructions.
- Update your packages with
sudo apt-get update - Upgrade your system with
sudo apt-get upgrade -y - Install exfat-fuse and exfat-utils with
sudo apt-get install exfat-fuse exfat-utils - Create the hard drive mount directory with
sudo mkdir /mnt/drive - Mount your hard drive to the mount directory with
sudo mount /dev/sda2 /mnt/drive - Reboot your pi with
sudo reboot
Note: This is everything the Installer Script does but just faster.
Connect to Raspi Drive with a Mac
- Find out what your Raspberry Pi’s IP Address is with
hostname -I(The real IP Address is the first one that it shows) - Download Fuse and SSHFS on your mac.
- Run and follow the instructions for both of the installers.
- Make a folder named Drive on your desktop.
- In Terminal run the command
sshfs pi@Your-IP-Address:/mnt/drive /Drive Folder(Replace Your IP Address with your IP Address and /Drive Folder with the path to the folder you created in step 4 :) - Put in your password for the pi (The default is
raspberry) - You should see a drive on the desktop named OSXFUSE Volume 0 (sshfs) if you see that drive it means it worked!
- All Done!


Connect to Raspi Drive with a Windows Computer
- Find out what your Raspberry Pi’s IP Address is with
hostname -I(The real IP Address is the first one that it shows) - Install SFTP Drive from NSoftware
- Follow the instructions to install it.
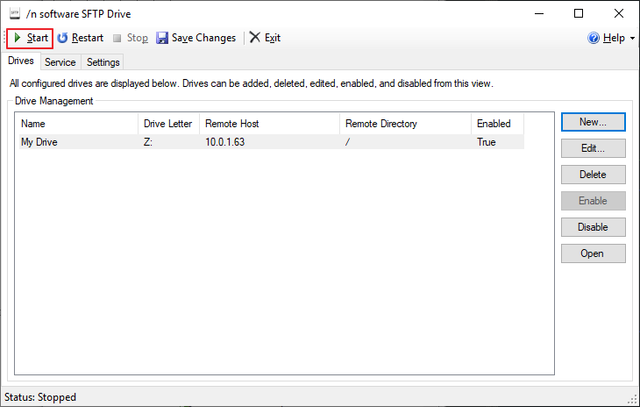
- Open the app up and then click on the Drives tab and then the New button
- On the Edit Drive dialog input a drive name (It can be anything) and SFTP server information (The default username and password is pi and raspberry). Click Test SSH Connection to verify the connection to the SFTP server, then press OK to save the new drive configuration.
- Press Start on the main window to connect to the drive.
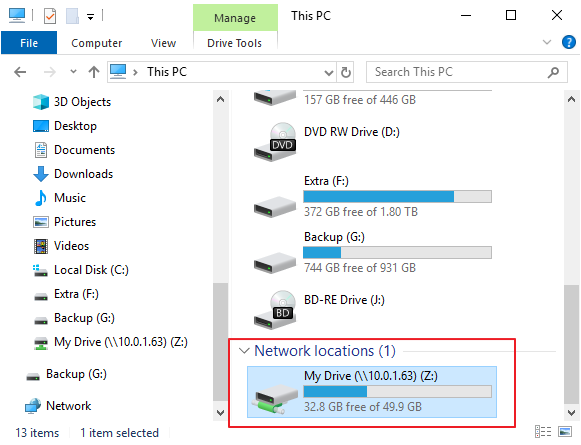
- You should now be able to access your drive from file explorer
- All Done!